
Download Guide:
Shannon's CCR Spiral Tree Build Guide
Shannon's CCR Spiral Tree Build Guide
Shannon's CCR Spiral
Shannon's CCR Spiral.pdf
Adobe Acrobat document [1.1 MB]
Shannon's CCR Spiral
Shannon's CCR Spiral.pdf
Adobe Acrobat document [1.1 MB]
Shannon’s CCR Spiral Tree
Disclaimer:
I take no responsibility for design failures or injuries related to this design. This document is created for informational purposes only and I cannot be held liable for any negative outcomes. You may share the document with others, but please do not change this document or take credit for it.
I take no responsibility for design failures or injuries related to this design. This document is created for informational purposes only and I cannot be held liable for any negative outcomes. You may share the document with others, but please do not change this document or take credit for it.
Introduction:
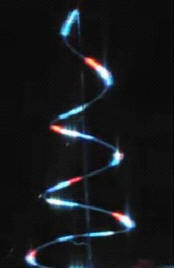
Here is a quick write-up with some pictures of the CCR Spiral Tree that I built for our 2010 Christmas Lights to Music display. I have had a few requests on how I built the CCR Spiral tree, so this document has been a long time coming. I hope it provides some clear direction and helps others with developing their own spiral designs.
Here is a quick write-up with some pictures of the CCR Spiral Tree that I built for our 2010 Christmas Lights to Music display. I have had a few requests on how I built the CCR Spiral tree, so this document has been a long time coming. I hope it provides some clear direction and helps others with developing their own spiral designs.

Parts List:
Qty
Description
Picture
2
Gang Square Electrical Box – Metal Type

2
1/2 in. x 10 ft. Electric Metallic Tube Conduit

5
1/2 in. Electrical Metallic Tube (EMT) Set Screw Connectors

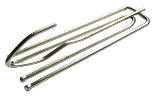
8
Curtain Hooks – Preferably with a multi-wire base to allow for easier strapping in the upright position.
8
¼ in. washers or other small size washer

2
Hose Repair Clamp
1
Spool of 50 lb. fishing line

Varies
UV Resistant Cable Ties – Medium Size

Varies
UV Resistant Cable Ties – Small Size

2 or (N)
Cosmic Color Ribbons (CCR)

1
Super Glue

1
50 ft. roll of 3/8 inch PEX pipe (The roll is preferred as it helps with shaping the spiral pattern) (The tubing is a cross-linked polyethylene tubing used for potable water application and is opaque white in color.) (It is important to get white looking one that is semi-transparent as it allows the light to diffuse properly.) (Home Depot SKU # 541176)

Assembly Instructions:
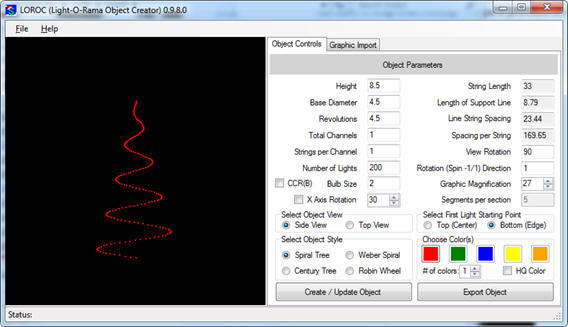
Calculations:
· I originally used the Spiral Tree Calculator spreadsheet that is available on various Christmas enthusiasts’ web sites (e.g. http://forums.planetchristmas.com/index.php?/topic/38908-spiral-tree-calculating-spreadsheet/ ).
· I have incorporated the calculations into my LOROC (Light-O-Rama Object Creator) software. It should give the same or very similar measurements as the spreadsheet, but the spreadsheet offers some additional markings that I did not use for spacing. (http://www.ShannonClaus.com/LOROC/LOROC.html)
Base and Center Pole
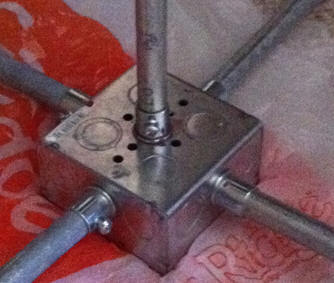
· Knock out the middle 1/2 in. holes (smaller outline if it has 2 in the same spot) on the junction box on all four sides and on the back plate (total of 5).
· Insert the Electrical Metallic Tube Set Screw Connectors in each of the 5 holes (from above) with the set screw side on the outside of the junction box. Securely tighten the nut on the inside of the junction box for each of the connectors. I preferred to have all of the set screws, for the EMT connectors on the side, facing to the side when the junction box is laying with the open side down on the floor or ground. This makes it easy to get to them for tightening. (see in picture above)
· Cut legs to calculated length (diameter minus 4 inches for the junction box and divided by 2). If you want a 4 feet base diameter, you would take 4 feet and convert to inches (4x12=48 inches). Then, subtract 4 inches (junction box) from that to get 44 inches. Divide that by 2 to get a leg length of 22 inches per leg.
· Cut the center vertical pole to the desired height based on the calculations. I used 8.5 feet (8 feet 6 inches).
· Insert all legs and the center pole in the EMT connectors and tighten the set screw. You can use some lock tight glue if you desire to secure them further. The legs go into the 4 EMT connectors around the side with the center pole going into the one on the top.
Hook Installation:

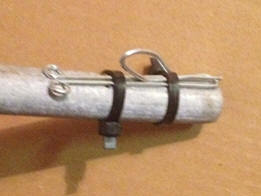
· Install a curtain hook at the end of each leg (total of 4) with the hook facing outward towards the end of the leg as depicted in the picture above. Use two cable ties to fasten the hook securely in place.
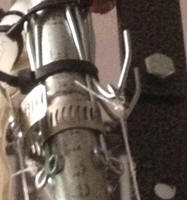
· Attach the other 4 hooks near the top of the center pole as depicted in the picture. They should be evenly spaced and lined up with the 4 legs. Use cable ties to secure them in place and then place a hose repair clamp around them and beneath the hooks to prevent them from sliding down. NOTE: Slide the hose clamp on first before placing the hooks in place.
Support Lines:
· As seen here in the picture, tie one of the small washers onto the end of the fishing line. Hook it onto one of the curtain hooks at the top of the vertical pole.
· Pull enough fishing line to reach the support leg hook that is lined up with the particular hook you used on top. Make sure the leg and junction box are flat on the ground or floor to get the correct length. Cut the line with a couple of extra inches on it.
· Tie another washer on the end that was cut and make it so that the line will be nice and taut when the washer is placed on the curtain hook.
· Do the same process for the other 3 matching sets of hooks (1 on top and 1 on the leg per set). This will form the support frame for the spiral tree.
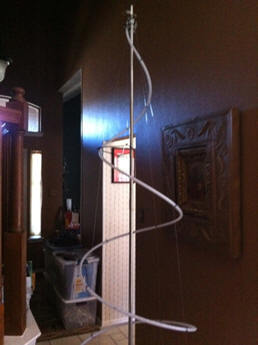
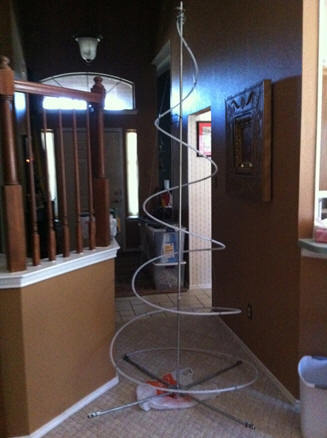
Making the Spiral Outline:
· Cut the PEX Pipe the necessary length based on the calculations. If you are using 2 cosmic color ribbons, you can measure the total length of the two ribbons and make the PEX tubing the same length. Note: You should allow for about 4 extra inches for folding or fastening the ends.
· Take the inner end of the rolled up PEX pipe that you cut off and make it into a smaller loop. In other words, roll it into a smaller tighter circle for the first several feet. This will help with the smaller top turns of the spiral tree.
· At the top, I fold the PEX pipe in half about two inches from the top. This was done to prevent water from going down inside the tube.
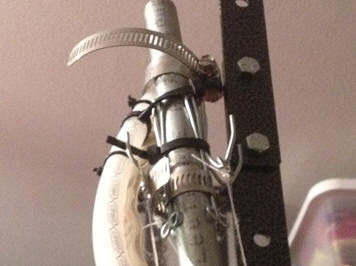
· Place the folded top near the top of the metal pole and in a slight angle in the direction that the spiral will be rotating. Fasten the tubing in place using the other cable repair clamp as depicted in the picture above.
· Slide the PEX tubing down the tree support line frame. Start adjusting it to your desired spiral shape.
· Work from the top down and fasten the PEX pipe to the support lines using small UV resistant cable ties. Do not pull tight just yet, but make them tight enough that it will hold the PEX in place. You should be able to move the PEX if necessary. Keep doing this until you reach the bottom. You should fasten the PEX pipe to the support line at each point that it intersects.
· Fold the PEX pipe in a 90 degree bend at the bottom and insert it into end of the leg to hold it in place. After you have your spiral the shape you want it, then pull all of the cable ties tight to secure the shape.
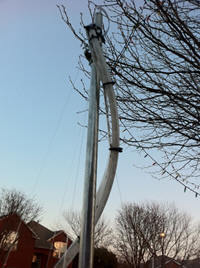
· There are pictures on the below that demonstrate the spiral shape.

Cosmic Color Ribbon Placement:


· The pictures above demonstrate what the CCR looks like in front of the tubing versus behind the tubing. The picture on the left shows the CCR in front of the tubing for demonstration purposes only. This method would cause the ribbon to face away from you as you wrap around the back side which would cause dark spots. The picture on the right shows the CCR behind the PEX tubing. It has the added benefit of causing the light to diffuse and the tubing glows. This works out well because as you go to the back side, the tube will glow with color even though the CCR is facing away from you. The right image is the method I used and what is seen in my videos.
· Start from the top of the spiral tree and fasten the CCR to the back side of the PEX pipe using small UV resistant cable ties. Only tighten the cable ties enough to hold the CCR in place. NOTE: Make sure to place them in the cut mark or less populated areas of the CCR in order to prevent damage to the CCR circuits. Continue this all of the way down the PEX pipe spiral. Once you reach the end of the CCR, start with the next CCR and continue. If you have excess CCR when you reach the bottom, run it down one of the legs of the tree to fasten it cleanly out of the way.

Spiral Tree Example Pictures:


· I placed the controllers for the CCR in a plastic bin with snap on lid. I cut a hole in one side near the lid to run the power cord and connector through. Then the bin was wrapped with plastic to disguise it as a gift box.
· Use stakes to hold the legs of the spiral tree flat against the ground. This keeps the support lines nice and taut.
· I used some of the fishing line for tie down support lines to keep the tree in place. This kept the tree the focal point by keeping the support lines from being too visible. After running into the lines a few times, I placed a rock at the base of each one to mark it on the ground. This served to remind me where they were located in order to avoid running into them.
Conclusion:
I hope you find this document useful and that I have explained it well enough. If you decide to make your own or have ideas on design changes, please share them. You can reach me through web site in the footer of this document or at NorthPole@shannonclaus.com.
Happy Holidays!
Shannon
Shannon